How to Transfer an Online Business to a New Owner: The Handover Checklist
The complete handover checklist: what to move, in what order, and how to make sure the new owner has full control and the old owner has none.

The handover is where a sale becomes real. The price is agreed, the money is secured, and now everything that makes the business work has to move from one person to another: the domain, the hosting, the code, the accounts, the money flows and the knowledge in the seller’s head. When you transfer an online business carefully, the new owner wakes up the next morning to a business that just keeps running.
When it’s rushed, things break: a domain stays in the wrong account, an ad network keeps paying the old owner, a recovery email lets the seller back in. This guide gives you the order, the details and a complete checklist so that doesn’t happen.
It works for websites, online stores, SaaS products, newsletters, digital product shops and social media accounts. Where a platform has its own rules, we point you to them.
Key takeaways
- Secure the payment first, through escrow or a trusted middleman, then start the handover.
- Back up everything before anything moves.
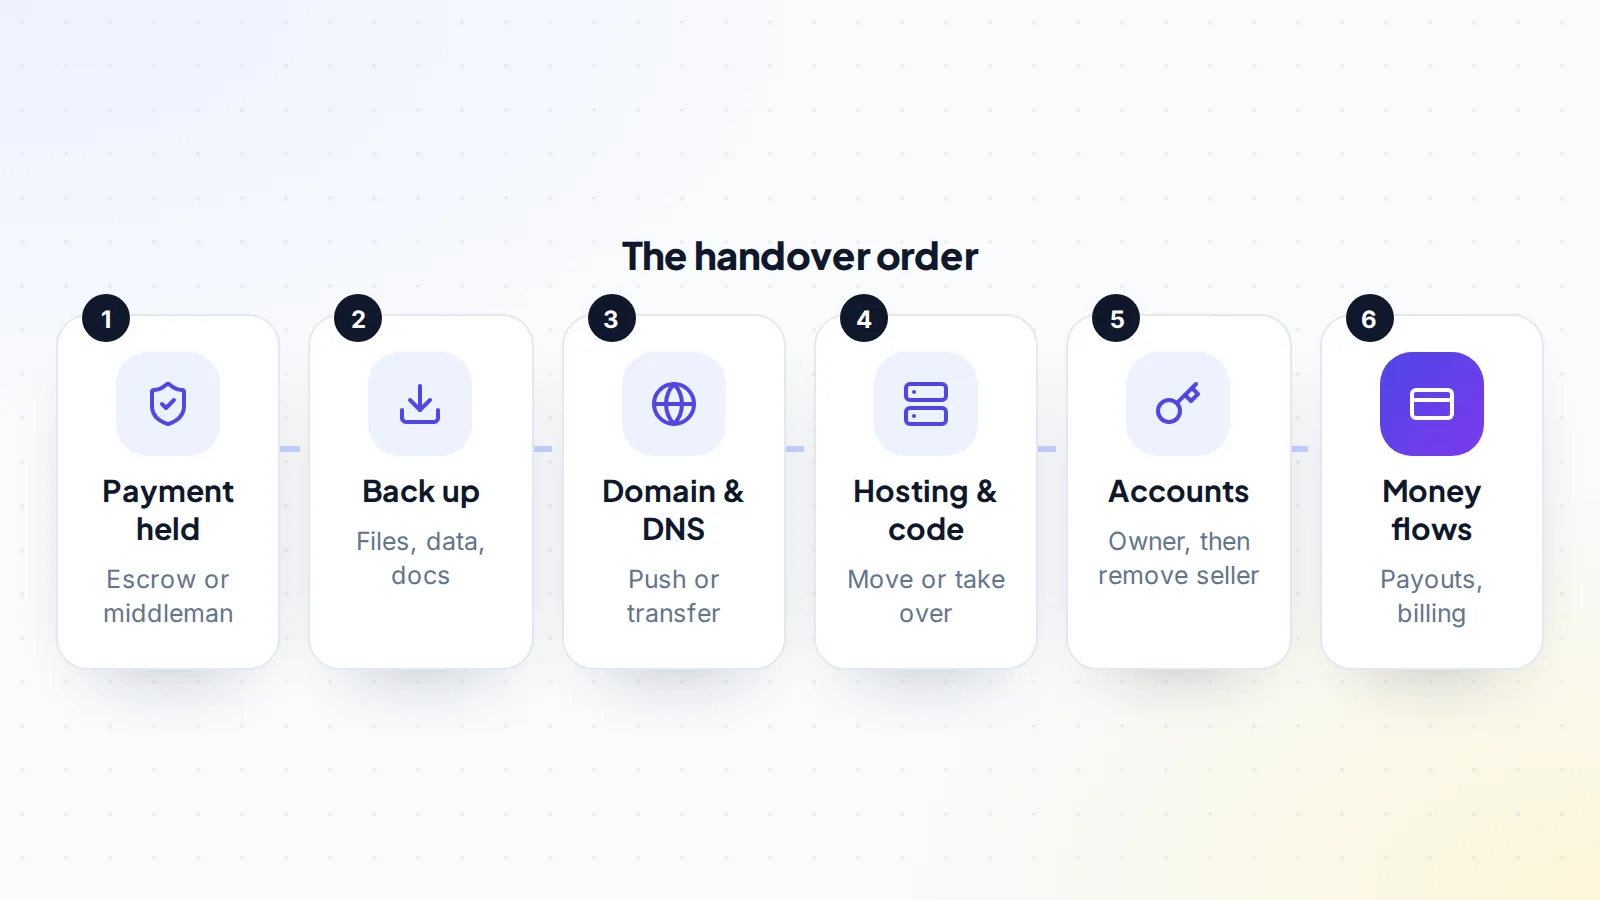
- Move in order: domain and DNS, hosting and code, accounts, then payouts and billing.
- Use each platform’s own ownership tools wherever they exist, and respect their waiting periods.
- Finish by changing every password and recovery option, and removing the seller’s access everywhere.
Before you start: agree the checklist
The best handovers are planned before the payment is made. Buyer and seller should write down, together, every asset that’s moving and how. A simple table is enough: the item, where it lives, how it moves, who does it and how the buyer will confirm it worked. Our asset transfer checklist gives you a template.
Agree a realistic timeline too. Some steps take minutes; others depend on platforms with their own processes or waiting periods. Building those into the plan avoids pressure later. And agree how you’ll communicate during the handover: one channel, ideally the same place where the deal terms are recorded. On digiflippers.com, the Deal Room keeps the agreed steps and every message together.
Step 1: Secure the payment
Nothing should move until the payment is secured. With escrow, the buyer pays a licensed escrow company and the seller confirms, in their own escrow account, that the funds are held. A trusted middleman can play a similar role. Read how escrow works and closing a digital asset deal. On digiflippers.com, the ways to pay in a deal are: directly to the seller, through escrow, and the platform never holds the money itself.
Step 2: Back up everything
Before the first change, the seller makes complete backups: website files and databases, product files and source files, email lists with consent records, customer data, documents, images and any content stored in third-party tools. The buyer should receive a copy straight away. If anything goes wrong during the move, the backups mean nothing is lost.
Step 3: Move the domain and DNS
The domain is the address of the business, so it moves early. There are two ways:
- Push: if buyer and seller use the same registrar, the seller moves the domain into the buyer’s account. It’s quick and keeps the expiry date.
- Registrar transfer: the seller unlocks the domain and gives the buyer the authorisation code; the buyer starts the transfer at their registrar. ICANN’s rules require the losing registrar to provide the code within five calendar days of a request.
Before the move, the buyer should note every DNS record (website, email, verification records, email authentication such as SPF, DKIM and DMARC), so nothing stops working when the domain changes accounts. After the move, confirm the buyer is the registrant, turn on two-factor authentication and set the domain to auto-renew. Read the domain transfer process for each step.
Step 4: Move hosting, files and code
There are two common approaches. Either the site is migrated to the buyer’s own hosting account, or the hosting account itself is transferred to the buyer, if the provider allows it. Migration gives the buyer a clean account with no history; account transfer is quicker when the setup is complex. For WordPress sites, our guide to transferring a WordPress website covers plugins, licences and admin users; for other sites, see transferring website hosting.
For SaaS products, the code repository, cloud accounts, deployment pipelines and secrets all move to the buyer. Every API key, password and secret the seller knew should be rotated afterwards.
Step 5: Transfer the accounts
Online businesses rely on many accounts. Use each platform’s own ownership tools wherever possible: they leave a clear record and avoid sharing passwords.
- Google Analytics and Search Console: the seller adds the buyer as an administrator or owner, the buyer confirms access, then the seller removes themselves. Google’s help explains users are managed under Admin → Access Management in Analytics and under Settings → Users and permissions in Search Console.
- Store platforms: Shopify’s help, for example, explains how the store owner can transfer ownership from the admin, with the new owner accepting by email.
- YouTube channels on Brand Accounts: the buyer is added as an owner; YouTube requires someone to have been an owner for 7 days before they can be made primary owner.
- Facebook Pages: the buyer is given Facebook access with full control, then removes the seller.
- Newsletters: Substack lets the owner transfer a publication from its settings, with both sides confirming; other platforms work differently.
- Email and workspace accounts such as Google Workspace: see transferring Google Workspace.
- Everything else: social profiles, design tools, support desks, email marketing, affiliate dashboards. Our guide to third-party accounts covers common tools.
Where an account can only move with its login, the buyer changes the password, email, phone number and recovery options immediately, then sets up their own two-factor authentication. See moving two-factor authentication safely.
Step 6: Switch the money flows
Money moves last, once the business is running under the buyer’s control. This includes:
- Ad networks and affiliate programmes: usually tied to a person or company, so the buyer applies with their own account and swaps the codes on the site. Ask each programme how it handles a new owner.
- Payment processors: for subscriptions on Stripe, Stripe’s support pages say the owner should contact Stripe Support to confirm what changes when a business is sold. See transferring Stripe subscriptions.
- Suppliers and services the business pays for: billing details move to the buyer, and the seller removes their cards.
Check the first payouts arrive in the buyer’s accounts before the inspection period ends.
Step 7: Hand over the people and the knowledge
Writers, developers, virtual assistants and suppliers often stay with the business. The seller introduces the buyer and confirms each relationship will continue on the agreed terms. Then the seller passes on what’s in their head: recorded walkthroughs, written routines, passwords for anything not yet moved and the context behind decisions. A few weeks of answering questions is common and very valuable; agree its scope in advance. See transition support after a sale.
Step 8: Customers
Decide together whether and how to tell customers. Many businesses keep the brand, support address and tone the same, so customers simply see continued service. Others send a short, honest introduction from the new owner. Our guide to telling customers a business was sold covers both approaches.
Handover mistakes to avoid
Most problems after a sale trace back to a handful of handover mistakes. Avoid these and you avoid almost all of them:
- Starting before the payment is secured. Once a domain or account has moved, it’s very hard to undo.
- Forgetting DNS records. A domain moved without its email or verification records can quietly break email delivery or tools that depend on it.
- Leaving the seller as an owner “for now”. Temporary access has a way of becoming permanent. Remove it as soon as the buyer is set up.
- Skipping recovery options. Changing a password but not the recovery email or phone leaves a back door open.
- Switching payouts too early. If the money flows move before the site is stable on the new hosting, problems are harder to trace.
- Not testing. Every item on the checklist should be confirmed by the buyer, not assumed.
A worked example
A buyer and seller agree the sale of an online store selling printables, built on a hosted store platform with its own domain, an email list and two social profiles. On day 0 the payment is confirmed in escrow and both sides tick through the agreed checklist. The seller exports the product files, the customer list with consent records and the email list, and shares them with the buyer.
On day 1 the seller starts the platform’s ownership transfer, which the buyer accepts by email. The domain is pushed to the buyer’s account at the same registrar; the buyer checks that email and store DNS records are unchanged. On day 2 the buyer is added to analytics and the email tool, then the seller removes themselves. On day 3 the social profiles move with their logins, and the buyer changes the email, password, phone and two-factor authentication for each. The buyer connects their own payout account, sees the first sale arrive and confirms in escrow on day 5. It’s a calm week, because every step was planned before anyone touched anything. That’s how to transfer an online business without surprises.
How long a handover takes
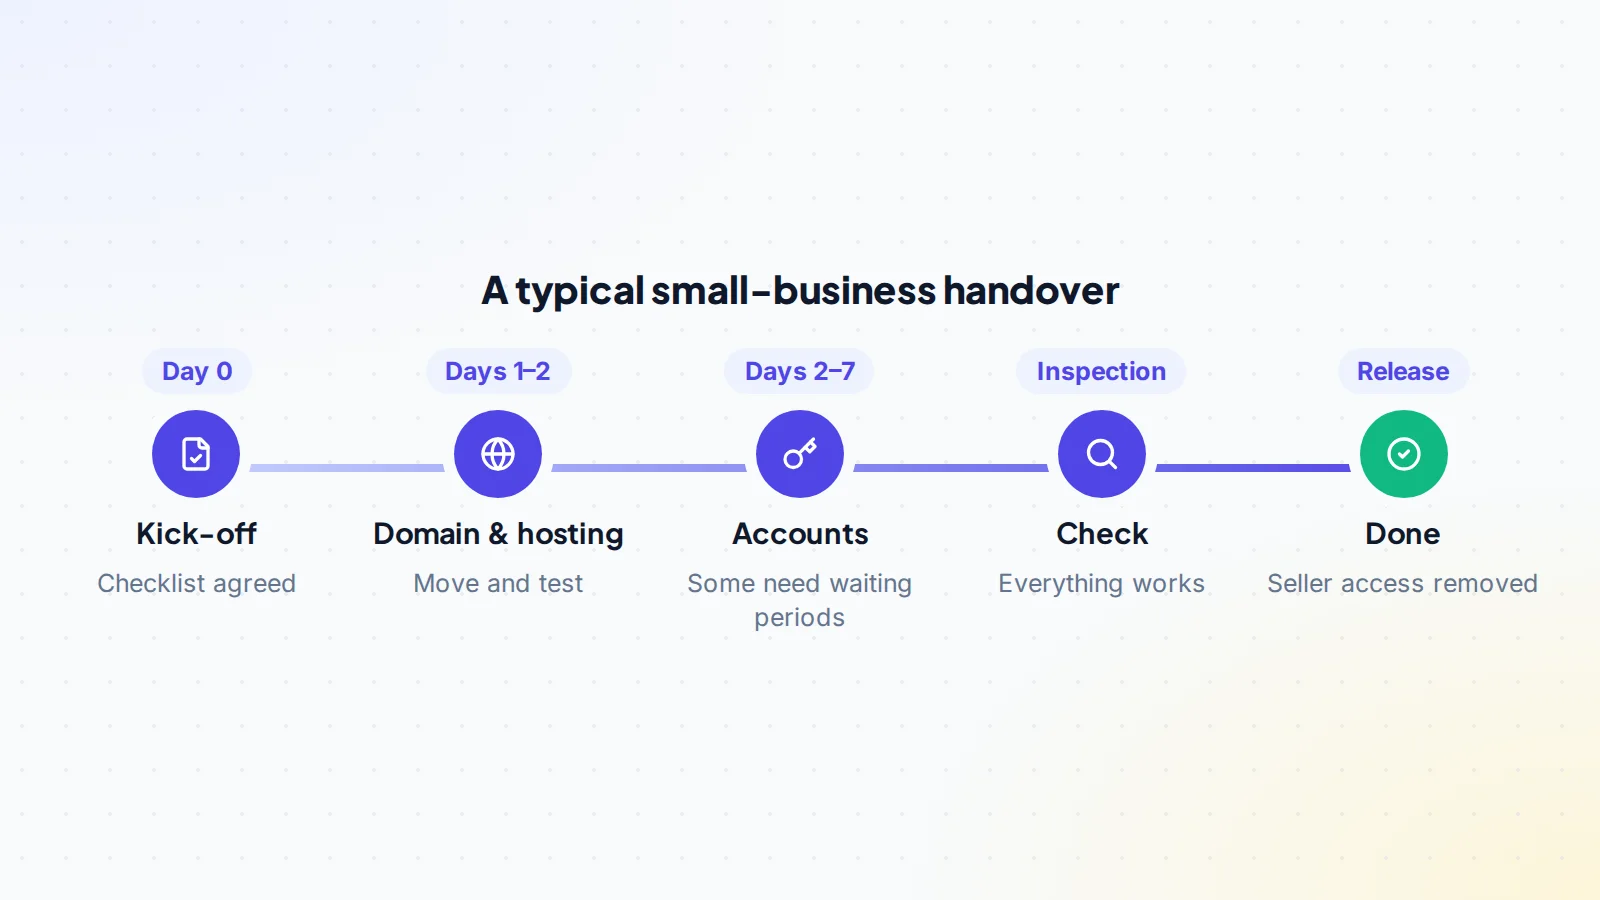
Small websites can be handed over in a day or two. Businesses with many accounts, platforms with waiting periods, or SaaS products with live customers take longer. Plan the inspection period to cover the slowest step.
What’s different for each type of business
The order above works everywhere, but each type of business has its own sticking points. For content sites, it’s ad network and affiliate accounts, which usually can’t move and must be replaced. For online stores, it’s suppliers, stock in transit and the store platform’s own transfer process. For SaaS, it’s billing and secrets: live subscriptions must keep charging, and every key the seller knew must change. For newsletters, it’s the sending domain and the subscribers’ consent. For social media and game accounts, it’s the original email and every recovery option. Knowing the sticking point for your deal tells you where to spend the most care.
Step 9: Finish cleanly
The handover ends when the buyer has full control and the seller has none. The buyer changes every password and recovery option and checks the access lists of every account. The seller removes their payment methods and confirms they’ve kept no copies of customer data beyond what the agreement allows. Both keep a copy of the agreement and the handover record. Then the payment is released, and the business has a new owner. Our guide to the first weeks after buying covers what comes next. If the agreement includes a non-compete, read non-competes in online business sales so both sides know where the lines are.
Checklist: how to transfer an online business
- Handover checklist and timeline agreed in writing.
- Payment secured in escrow or with a middleman.
- Complete backups made and shared with the buyer.
- DNS records noted; domain pushed or transferred; buyer is registrant with 2FA and auto-renew.
- Site, files and code moved; secrets and API keys rotated.
- Analytics, Search Console and platform accounts transferred with their own tools.
- Accounts moved by login secured: password, email, phone, recovery, 2FA.
- Payouts, payment processors and billing switched; first payouts confirmed.
- People, suppliers and knowledge handed over; customers informed if agreed.
- Seller’s access and payment methods removed everywhere; payment released.
Ready to find your next asset?
Browse listings with verified numbers, ask sellers your questions before you offer, and agree every step in a free Deal Room.
Frequently asked questions
What should be transferred first?
Secure the payment, back up everything, then move the domain and DNS. Accounts follow, and money flows such as payouts and billing move last.
How long does it take to transfer a website to a new owner?
Often one to a few days for a simple site, longer when platforms have waiting periods or the business has many accounts.
Should the seller share passwords?
Only where an account can’t move any other way, and only after the payment is secured. The buyer should change the password and every recovery option immediately.
Do ad networks and affiliate programmes transfer?
Usually not as accounts. The buyer applies with their own account and replaces the codes on the site. Ask each programme about its rules.
What if something breaks during the handover?
That’s what the backups and the inspection period are for. Raise it in writing before the period ends, and the payment stays protected until it’s fixed.
Who should do the technical work?
Usually the seller does the steps that need their access, such as pushing the domain or starting a platform transfer, while the buyer confirms each one. For complex sites or software, either side can bring in a developer.
When is the handover finished?
When the buyer controls every asset and account, the money flows reach the buyer, and the seller’s access is gone. Then the payment is released.
Keep reading
Sources
- ICANN: About Auth-Code
- Google Analytics Help: Add, edit, and delete users and user groups
- Search Console Help: Managing owners, users, and permissions
- Shopify Help Center: Changing or transferring store ownership
- YouTube Help: Change channel owners & managers with a Brand Account
- Stripe Support: Transfer a Stripe account due to a business sale